Frequently Asked Questions
How do I access my Virtual Safe?
How do I add files to my Virtual Safe?
How do I view/download documents from my Virtual Safe?
How do I share documents with colleagues?
My Virtual Safes – User Guide
To access your Virtual Safe, you must first login to your SecureDock account and click on the My Safes link located on the left navbar or click the Go to Virtual Safes link from your dashboard drop-down menu.

The My Virtual Safes page is divided into two main columns. The left column displays all of your active storage safes and the right column shows the contents of any storage safe, folder, or sub-folder that is currently selected.

*Note: Depending on your industry or company workflow requirements, your default storage safes may contain a list of preloaded folders and sub-folders that can be used to you better organize your documents.
Adding Documents to your Virtual Safes
There are three different methods for adding documents to your storage safes. The first method is to manually select files from your computer or device and uploading them directly using the Browse feature located at he bottom of the My Virtual Safes page. The second method is to Store inbound documents directly into a new or existing virtual safes from the download options page. The third method is to have you or your clients upload documents directly to your Virtual Safe using a Direct Upload URL.
Method 1: Upload files using the Browse feature
Starting at the My Virtual Safes page, first select the destination safe, folder, or subfolder that you wish to upload files to. *Your upload destination will be displayed in text at the bottom of the page. Next, click the Browse button to select the files from your computer or device. Then click the Upload button to finish adding your files.

Method 2: Store inbound files in your Virtual Safe
Whenever documents are sent to you via your Inbound URL, you will receive an email notification with the option to download the documents to your device or “Store” documents within a new or existing virtual safe.


Method 3: Direct Upload to Virtual Safe
To have files uploaded directly to your Virtual Safe, right click on the safe (or click on the context menu) and select the Direct Upload URL option from the drop-down menu.

From the pop-up menu, click Copy URL to Clipboard and then paste the link in a location of your choosing (ex: new email, signature block, company website etc…). Upload description text and email notification settings can also be controlled here.

*Once the link has been placed, you or your clients can now begin collecting documents securely using this method.
Sending Documents from your Virtual Safe
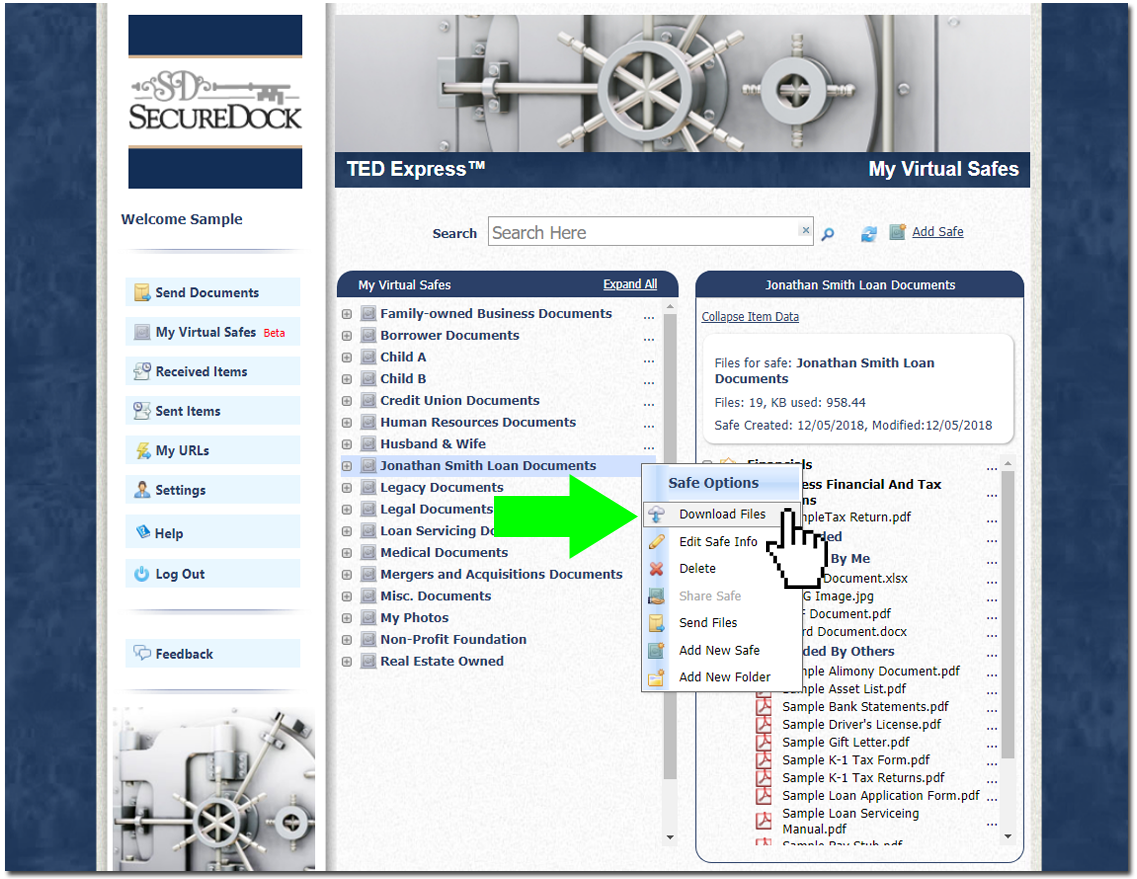
To send documents securely from within our Virtual Safe, first right-click on the safe title, folder, sub-folder, or individual document title you wish to send, then, click the Send Files option from the drop-down menu.
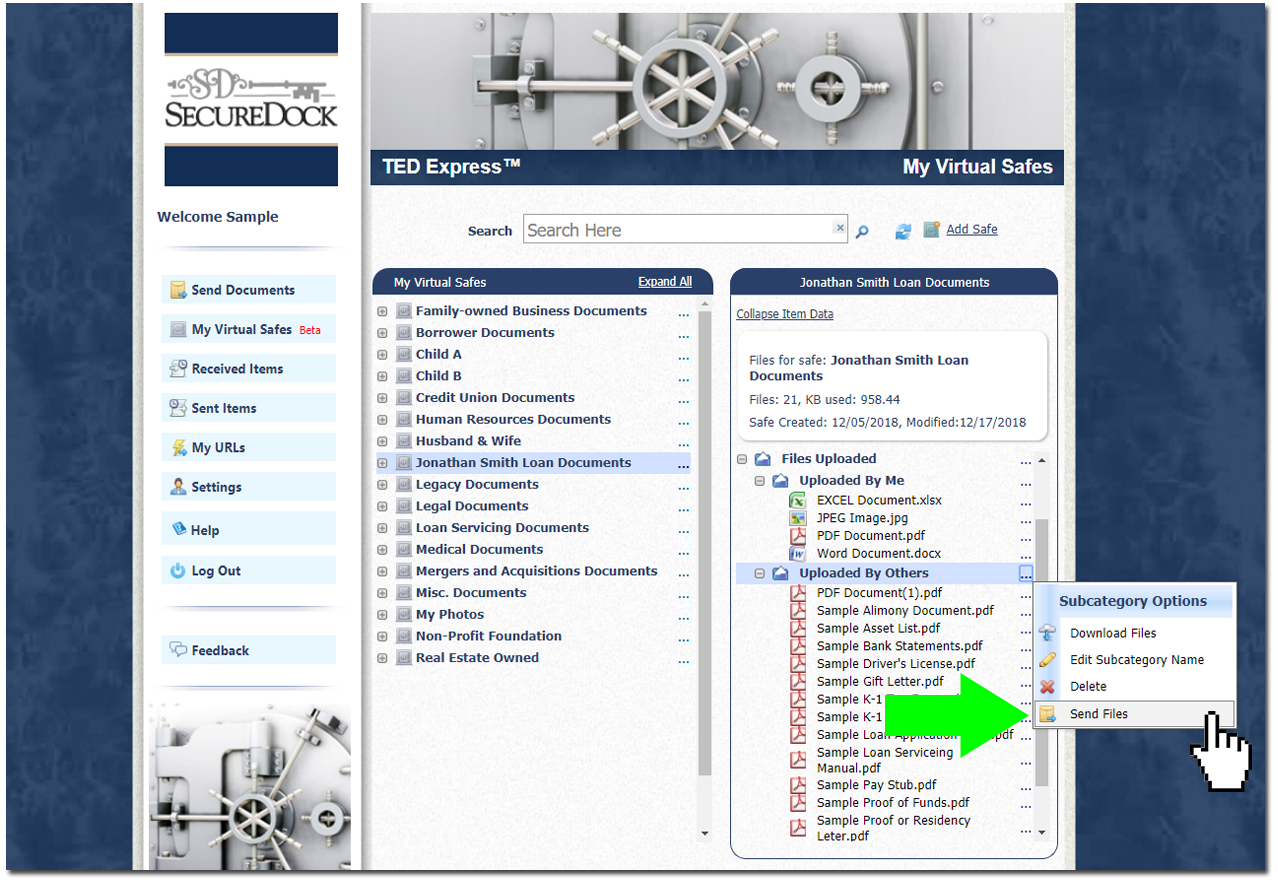
Once your items have been selected, you will automatically be redirected back to the Send Documents page where your preselected items will be displayed and ready to send.

To complete the outbound file transfer click the Send Documents Securely button at the bottom of the form. If additional items need to be selected from your virtual safe, you can also click the “Browse my virtual safe files” button to continue selecting additional documents.
Download or Preview Documents
To download or print preview documents from within your Virtual Safe, right-click on the exact safe, folder, or subfolder that you wish to view. Then click the “Download Files” option from the drop-down menu and a copy of the file(s) will be downloaded to your computer.
Sharing Safes
With the Virtual Safe, you now can share or give permissioned access to specific storage safes for team members or outside individuals. Below are instructions on how to share safes with colleagues in your organization or with outside individuals (non-account holders).
Sharing with colleagues
To share safes with other members within your organization or designated access group, first, click on the Share Safe button located at the top of the My Virtual Safes page. This will open a dialog showing your list of available colleagues as well as options to manage your sharing permissions.

While on the Colleagues Tab, scroll or use the search bar to select the individual you wish to share your safe with. Then, click the Edit Permissions button to select which storage safes and permissions you would like to give this user.

Once your sharing permissions have been set, click the Save button to save your changes.

Sharing Permissions:
Read Only: Allows individuals to only download and send content within a shared safe.
Allow Access: Allows individuals to download, edit, and send content within a shared safe.
*Once your sharing permissions have been set, your colleague(s) will then be able to log in to their existing SecureDock account(s) and will see your shared safe displayed on their My Virtual Safes page, highlighted in BLUE indicating that the safe has been shared by you.

Viewed from colleague’s perspective
Minimum System Requirements
PC
Operating System: Windows 7, Windows 8, Windows 10
Browser: Internet Explorer 9.x or higher, Firefox 28x or higher, Chrome 33.x or higher.
Memory: 2GB RAM recommended
Network Compatibility: Ethernet Card or Wi-Fi
MAC
Operating System: OSX 10.5 (Leopard), OSX 10.6.X (Snow Leopard or higher)
Browser: Safari 5.x or higher, Firefox 28.x or higher, Chrome 33.x or higher
Memory: 2GB RAM recommended
Network Compatibility: Ethernet Card or Wi-Fi