SecureDock Setup Guide
Quick Links
Account Registration / Activation
Email Signature Link Setup Instructions
Introduction
What is SecureDock?
SecureDock is a web-based application designed to offer you and your clients a simple and secure method to transmit sensitive or large file sets from any internet-connected computer or device. There’s no need for software installation, and your clients don’t require a login or password to send you files securely. SecureDock ensures the protection of your client’s sensitive information by eliminating the typical vulnerabilities associated with distributing documents via standard email.
How does it work?
SecureDock operates through its proprietary File Transfer process. This system utilizes secure “link” transmission, employing AES 256-bit and P2P encryption. Files transmitted or stored are encrypted both at rest and during distribution, ensuring heightened security throughout the process. Additionally, all file transfer activity is meticulously logged using our compliance reporting features, granting users full visibility and control over their sent and received file transmissions.
Getting Started
Account Registration & Activation
To register your SecureDock account, contact your system administrator or SecureDock support representative to request a copy of your company registration link.
Account Login
Once you have completed your account registration and verified your email address, you can log in to your account by visiting https://www.mysecuredock.com/m.
*We highly recommend bookmarking this login URL in your browser for future use.
Your Dashboard
The dashboard page gives you a quick overview of your account with task reminders showing any items that currently require your attention.
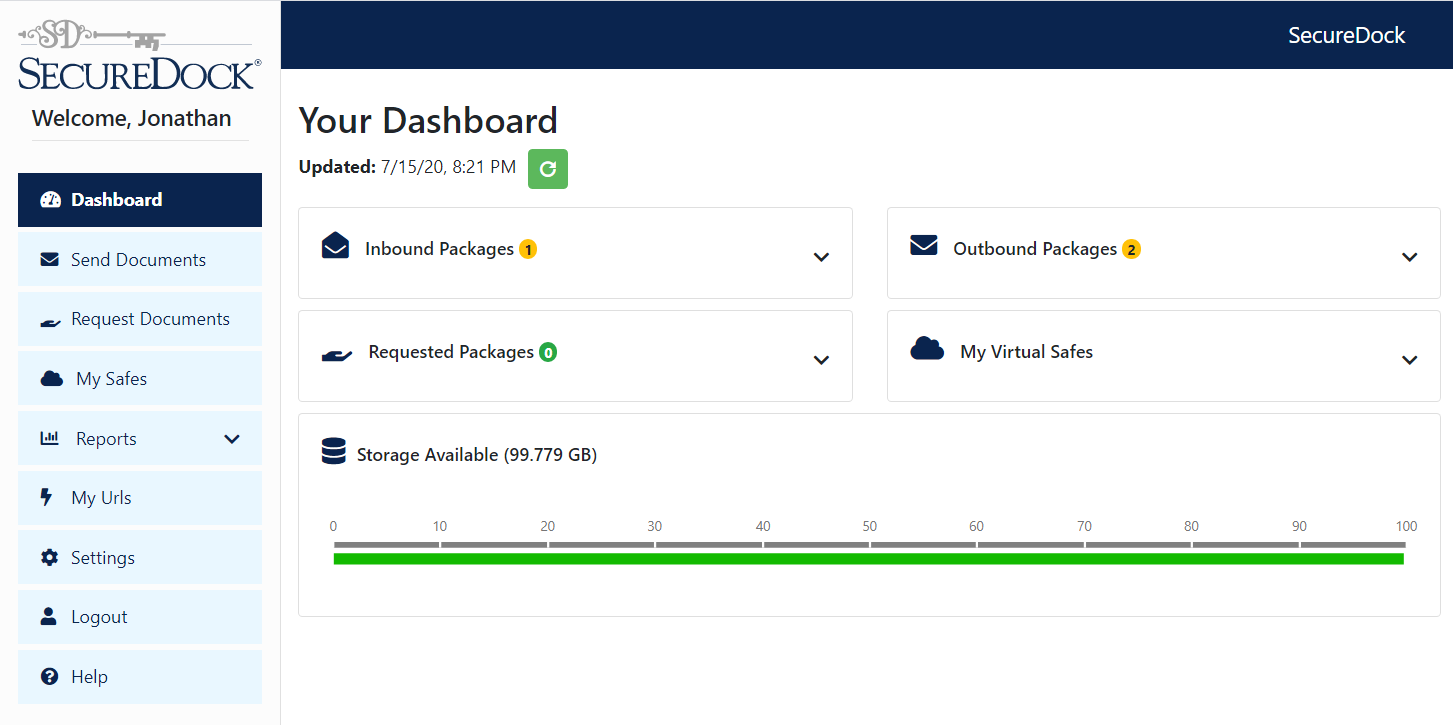
 Inbound Packages
This cell shows the number of Inbound file packages that are currently awaiting download. The drop-down arrow will also show you how many Inbound file packages you have received in the past 7 days. It also provides a direct link to your Received Items report.
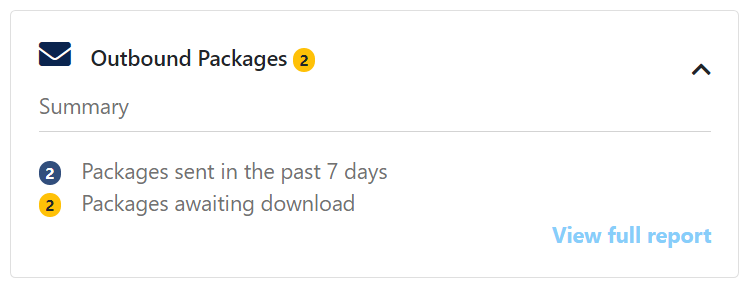 Outbound Packages
This cell shows the number of outbound file packages that are currently awaiting download. The drop-down arrow will also show you how many outbound file packages you have sent in the past 7 days. It also provides a direct link to your Sent Items report.
 Requested Packages
This cell shows the number of pending document requests that are currently awaiting fulfillment. The drop-down arrow will also show you how many document requests you have sent in the past 7 days. It also provides a direct link to your Requested Documents report.
*Available with Virtual Safe subscriptions only
My Virtual Safes
This cell shows you how many active storage safes, stored documents, and how much available storage you currently have in your Virtual Safe. It also provides a direct link to your My Virtual Safes page.
*Available with Virtual Safe subscriptions only
SecureDock Inbound URL (Email Signature Link)
Your SecureDock Inbound link provides your clients and colleagues with a simple and secure way to send you documents or large file sets securely, right from a secure link in your email signature. *No login or password required for your senders.
Inbound Link Setup Instructions
- Click on My URLs on the left.
- Copy your TED Express Inbound URL or pre-formatted hyperlink to your clipboard.
- Paste your link to the bottom of your email signature block, or your company’s website.
- Send yourself a test document (recommended)
Microsoft Outlook Instructions
Outlook (Desktop Version)
- Open Outlook on your desktop
- Open Microsoft Outlook and create a new email message.
- On the Message tab, in the Include group, click Signature, and then click “Signatures”
- Select your existing Email Signature.
- Paste your TED Express Inbound URL or pre-formatted hyperlink your signature block.
- Click Save
Outlook 365 (Web version)
- Open your Microsoft 365 Outlook (Web version)
- On the Navbar, choose Settings > Options.
- Under Options, choose MAIL > Layout > Email signature.
- Paste your provided TED Express Inbound URL or pre-formatted hyperlink into the text area.
- Click Save Changes
Inbound Upload Page – Client View
Whenever your client clicks on your Inbound link, they will automatically be redirected to the secure upload page where they can follow the simple instructions to complete their secure file transfer.

Before completing their transfer, the sender will be asked to complete all required steps before clicking the “Send Documents Securely” button. Once sent, they will receive an automated confirmation email confirming that their documents have been uploaded.
Receiving Files (Inbound)
SecureDock allows your clients to upload sensitive/large file sets securely using encrypted links that can be placed directly on your email signature block or company website.
Inbound File Size Limitations
The application is designed to handle large file sets so your clients should not have any problems uploading large tax-returns or other multi-media files that are within the standard 1,000 MB / 1GB size range (per individual file). There is also no limit to the number of individual files that can be sent (per upload).
Downloading documents
Whenever files are uploaded to your TED Express Inbound Link, you will receive an automated email notification containing a download link.

To download the file package, simply click on the Download Now button located in your email notification and input your user verification (SecureDock Username and password) to retrieve your files.

From the secure download page, select the option to download files to your device.

Unzip/Extract File(s)
*SecureDock delivers packages in zip-file format. To unzip/extract files, locate your computer’s default download folder and locate your zip file (File Name: TEDexpressDocs[date].zip). You can then extract the files to any location on your device. Learn more about using Zip Files
Downloading documents from your iOS or Android Device
For instructions on how to download/retrieve file packages from your iPad, iPhone, or Android device Click Here

Downloading documents from your reports
File packages can be downloaded directly from your Sent Items or Received Items reports by first clicking on the status icon in the far right column, then click the Download Docs option from the drop-down menu.

Your Received Items displays the following data:
- Date: Shows the date and time the file package was sent (Central Time).
- Sender name / email address: Shows the sender’s name & email address.
- Status: Shows the current state of the file package.
- Available – The file package is available for download.
- Viewable – The Secure Message is available to view (click Message tab in details to view)
- Downloaded – The file package has been downloaded.
- Stored – The file package has been stored in you Virtual Safe.
- Forward – The file package has been forwarded to a new recipient.
90-Day File Archiving (Reports)
All files that are uploaded to the system are automatically stored on the secure cloud for a default 90-day archive period. During this time, files can be downloaded, previewed, resent, or shredded by the account holder. *Once a file has reached its archive limit, the digital file(s) will automatically be shredded from the system.
Sending Files (Outbound)
To send documents securely using TED Express, first make sure you are logged into your account and are on the Send Documents page. From there, follow the simple instructions listed below.
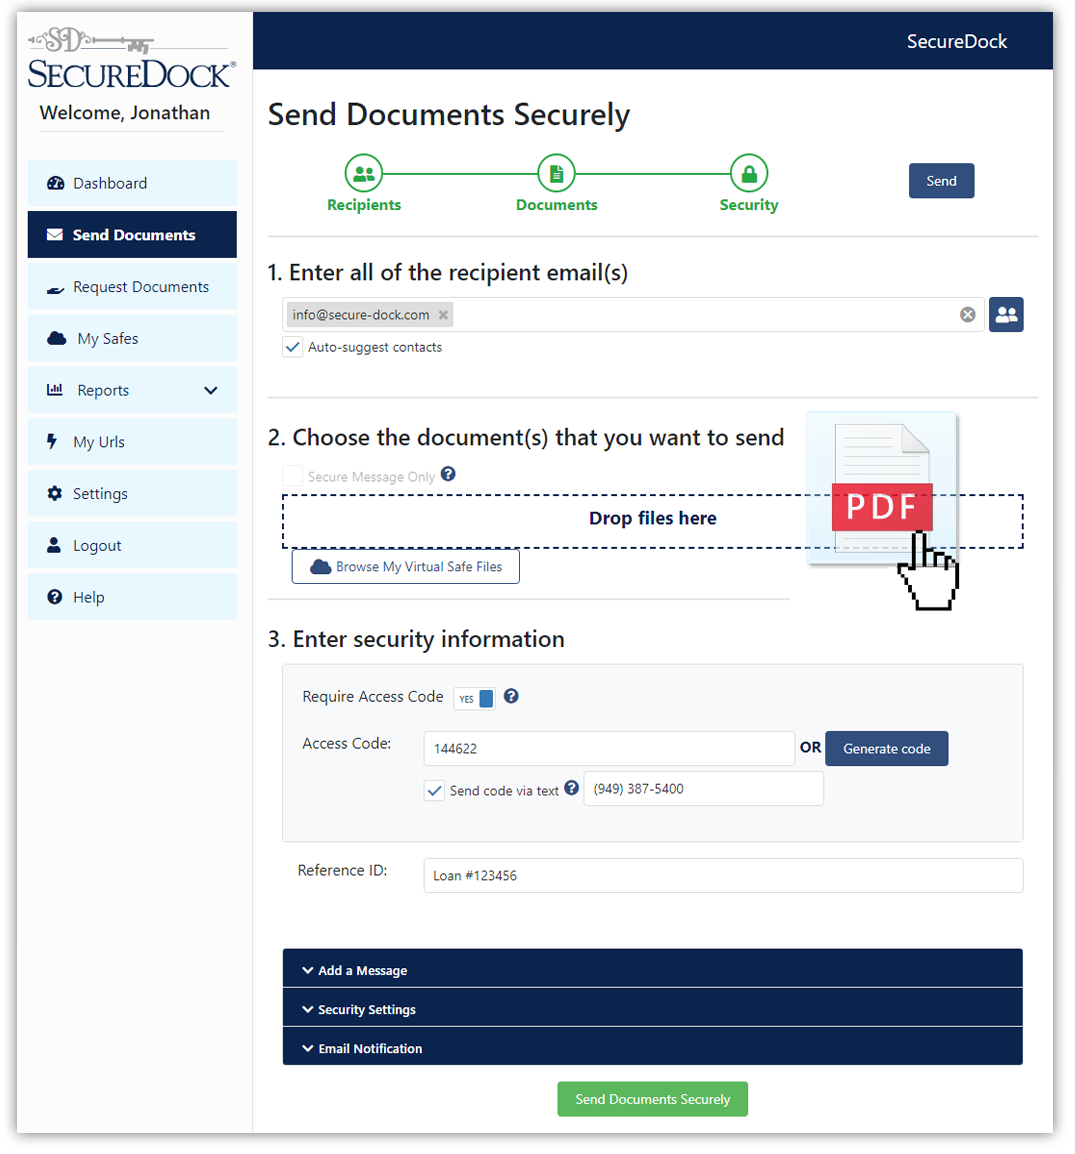
Step 1: Enter all of the recipient emails
Enter one or more email addresses or select recipients from your contacts.
Step 2: Choose the document(s) that you want to send
Open any file folder on your computer and then drag and drop multiple files into the selection field or click on the “Browse” button to manually select one or more files from your computer.
Step 3: Enter the security information
Access Code (Recommended for highest security)

Access Codes allow you to add additional 2-Factor authentication to each of your outbound file transfers. Up to 40 characters, letters, numbers, can be manually inputted or can be auto-generated.
Important! It is the sender’s responsibility to inform the recipient that an additional access code has been required. This may be done using the automated SMS Text feature, verbally (over the phone), or using any other secure method of communication.
SMS Text Feature
The SMS Text feature allows you to automatically send your Access Code directly to your recipient’s mobile device.
Reference ID
A Reference ID is a separate identifier that is intended to help you keep track of specific document packages (Example: Loan ID, Policy #, Case #, etc..).
Add a Message
Instructions to recipient
Your instructions will be displayed within the body of the email notifications and are not part of the secure file package.
Secure Message to the recipient
Your secure message will automatically be encrypted and will only be visible to your recipient after they have inputted the required verification (i.e. email address and access code [if applicable])
Security Settings
Link Expiration
Select the amount of time that you wish your download link to be available (24 hours, 48 hours, 72 hours, 7 days, or 14 days). Once a document package has been sent, and the Link Expiration time has been reached, the download link will no longer be available to your recipient. Your default Link Expiration can be changed from within on your account Settings.
Max. Downloads
Select the number of allowed package downloads per recipient. (1, 3, 5, 10, or Unlimited). Default Max. Downloads can be changed from within on your account Settings.
Email Notifications
Select which automated email notifications you would like to receive. *Your default email notifications can be configured within your Account Settings.
Reports
Your SecureDock reports allow you to keep track of your sent and received file packages, in real-time. You can also perform a variety of useful operations to ensure that your files are kept secure and accessible when you need them most.

Sent Items
Your Sent Items report shows you a chronological list of all of your outbound transactions (most recent at the top). Here you also have a variety of advanced reporting tools designed to help you better manage your secure file packages. This report can be accessed via your dashboard or by clicking on the Reports tab from the navigation menu.
Your Sent Items report displays the following data:
- Date/Time Sent: This shows the date and time your document package was sent (Central Time).
- Recipient: Shows the recipient’s email address.
- Status: This shows the current state of the file package.
- In Transit: The document package invitation email is being delivered to your recipient’s email inbox.
- Delivered: The document package invitation email has been delivered to your recipient’s inbox and is awaiting download.
- Downloaded: The document package has been downloaded by your recipient.
- Expired: The document package has not been downloaded and has reached its Link Duration Time. No longer available for download unless the package link is manually extended.
- Rejected: The document package invitation email has been rejected by your recipient’s email server.
- Canceled: The document package has been canceled by the sender and is no longer available for download.
- Forward: The document package has been forwarded to a new recipient(s).
Package Options (Sent Items)
Your package options allow you to perform essential tasks for any selected document package. These options will be applied to the entire document package (and all included recipients) and are available by clicking on the status icon of the document package you are viewing.

-
- Cancel Package – This will cancel the current document package link and will no longer be available for download by your recipient(s).
- Download Docs – This will download the contents of the document package directly onto your computer.
- Export History – Downloads a detailed copy of the entire history/activity log for that package.
- Forward – This will forward the selected file package to others securely. This option will also allow you to add or remove specific documents from the package before sending.
- Shred Docs – Permanently shreds the contents of your document package.
Note: After a document package has been shredded, the file will no longer be archived for later use. All log records of actions taken will be stored in the package history details. - Edit Data – Modify / Edit Reference ID for selected document package.
Recipient Options (Sent Items)
Your Recipient Options allow you to Extend, Resend, Edit, Cancel, and Forward the selected package. To access these options, click on Sent Items and then click the + sign next to the package you wish to view. Then click on the Recipients tab and left-click on the recipient you wish to take action.
-
- Extend – Extend/modify the Link Duration Time for your sent document package.
- Set Max Downloads – Set/modify the number of allowed downloads for your sent document package.
- Resend Package – Resend the document package link.
- Edit Email Address– Edit the email address of any selected individual. Once completed, the document download link will be sent to the updated email address.
- Cancel Package – Cancel any current file package (a download link will no longer be accessible for your recipients)
- Forward – Forward the selected file package to others securely. This option will also allow you to add or remove specific documents from the package before sending.
Package Details + (Sent Items)
By clicking on the +sign in the far left column, will expand your Package Details. From there, you can select any of the available tabs to view more in-depth details about your file package.

- Files Tab – Shows Filename & Filesize (document preview option is also available here)
- Recipients Tab – Shows the name and email address of all individuals included in the distribution, as well as the current link expiration time and package status for each recipient listed. Downloads – Shows detailed information about when or if the package was downloaded.
- History Tab – Shows detailed log record of all actions taken (i.e. emails sent, the message included, etc..) along with a timestamp and IP Address information for each action.
- Emails Tab – Shows all email notifications and email event history for any selected document package (email event history also available here)
- Messages Tab – Shows all messages and/or instructions included in any selected document package.
Received Items
Your Received Items report will show you a chronological list of all of your inbound file transfers (most recent at the top). Here you also have a variety of advanced reporting tools designed to help you better manage your secure file packages. This report can be accessed via your dashboard or by clicking on the Reports tab from the navigation menu.
Your Received Items displays the following data:
- Date/Time Sent: This shows the date the package was sent to you (Central Time)
- Sender’s Information: Shows the sender’s name & the sender’s email address.
- Status: Shows the current state of the file package:
- Available – The file package is waiting to be downloaded.
- Downloaded– The file package has been downloaded.
- Forward: The file package has been forwarded to a new recipient.
Package Options (Received Items)
Your package options allow you to perform essential tasks for any selected document package. These options will be applied to the entire document package (and all included recipients) and are available by clicking on the status icon of the document package you are viewing.

Package Details + (Received Items)
By clicking on the + sign in the far left column, will expand your Package Details. From there, you can select any of the available tabs to view more in-depth details about your file package.

- Files Tab: Shows file name and file size.
- Recipients Tab: This shows the names and email addresses of all other individuals included in the distribution.
- Downloads Tab: This Shows detailed information about when or if the package was downloaded.
- History Tab: Shows detailed log record of all actions taken (i.e. emails sent, the message included, etc..) along with a timestamp and IP Address information for each action.
- Emails Tab: Shows all email notifications and email event history for any selected document package (email event history also available here)
- Messages Tab – Shows all messages and/or instructions included in any selected document package.
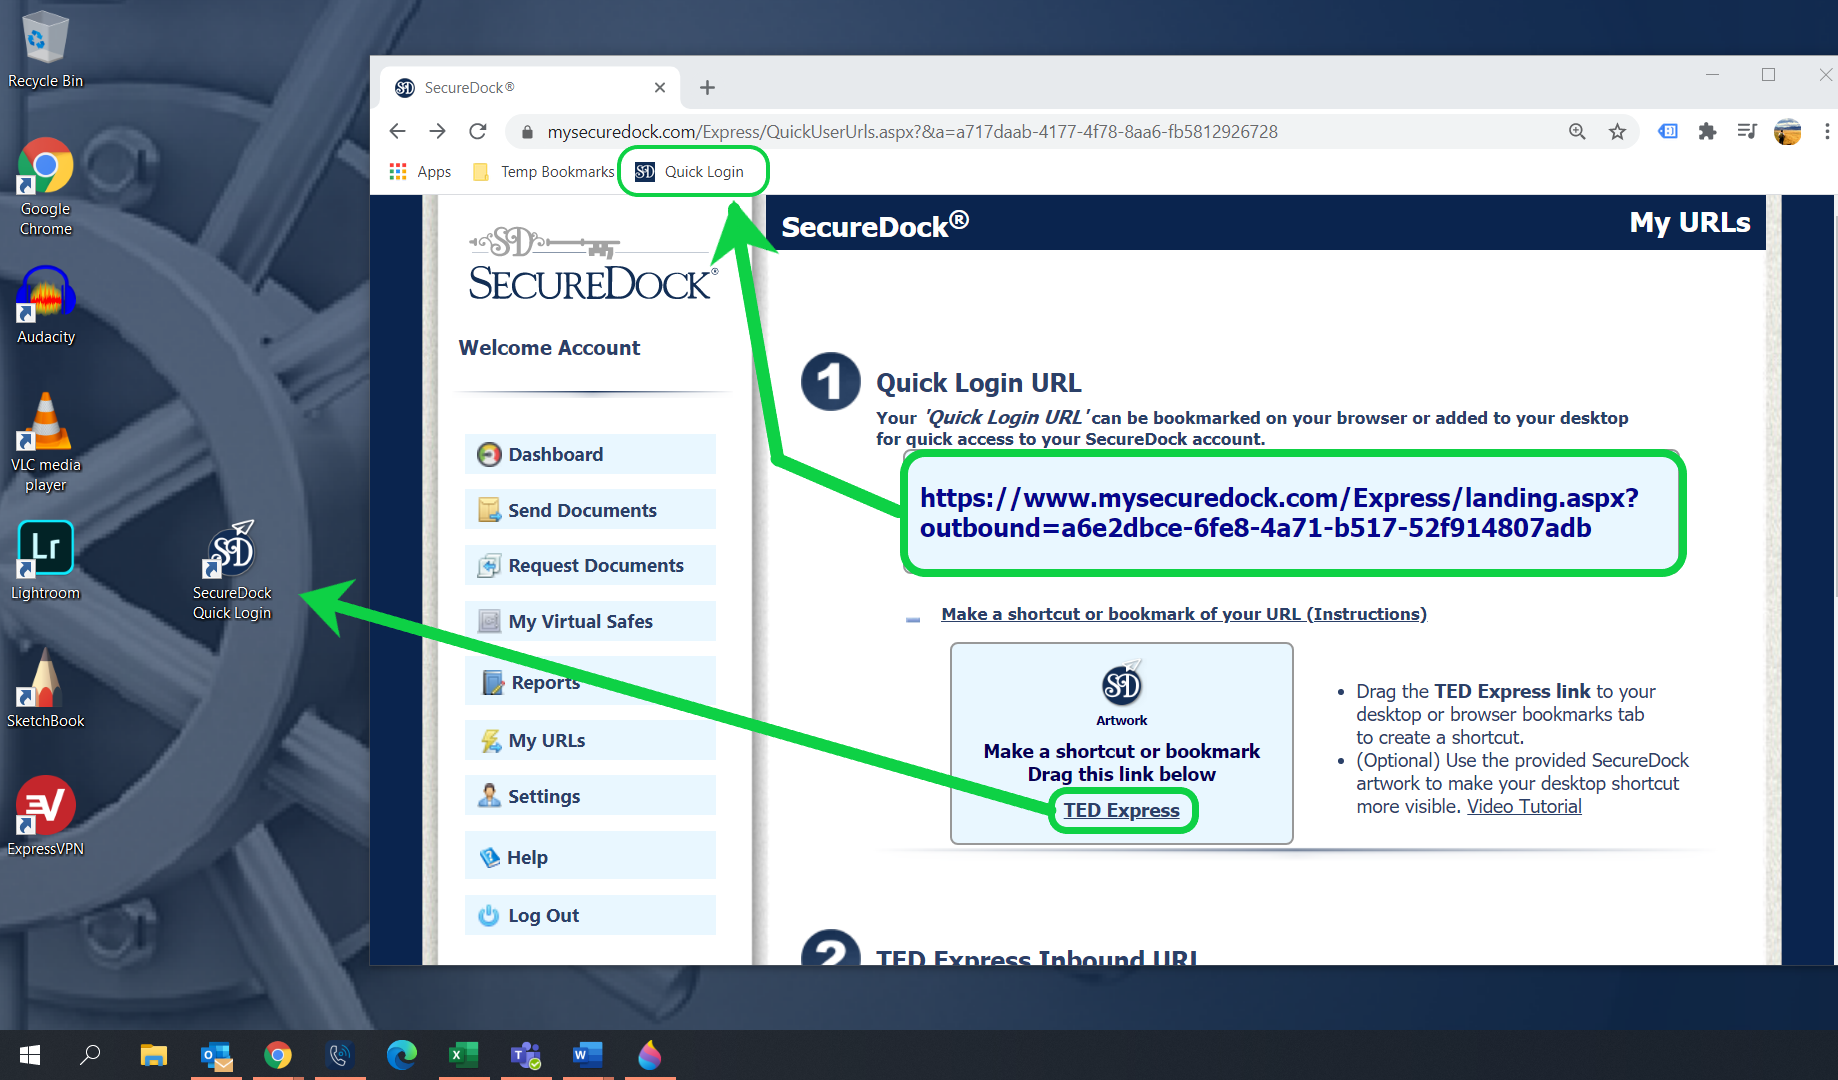
My URLs
The My URL’s page provides you with all of the vital URLs relevant to your SecureDock Account. These URL’s Include your Quick Login URL, as well as your TED Express Inbound URL(s)
Quick Login URL
Your quick login URL can be bookmarked on your desktop or internet browser bookmarks bar to give you quick access to your SecureDock account.
Account Settings
Your account settings allow you to manage your account information such as your general profile information, billing information, security settings, email notifications. To access your account settings, you must first log into your TED Express account and click on the “Settings” tab.
User Profile
Includes basic account login information such as Username and Email Address.
Billing Information
Depending on your current subscription type (monthly or annual subscription), valid credit card information must be entered to continue service (unless you are billed externally through your company). Credit card information can be updated on your account Settings page.
How to add payment information online (instructions)
- log in to your SecureDock account by visiting: https://www.mysecuredock.com/m
- From the Dashboard page, click on Settings on the left
- Click on +Billing Information
- Enter credit card information in the provided fields.
- Click Submit Changes at the bottom.
Billing History
Detailed billing history that displays the Action Date, Billing Notes, and Bill Through Date. *Separate billing invoices can be provided upon request by contacting us at info@secure-dock.com
TED Express Settings
Set the default Inbound and Outbound Access codes as well as the default package expiration time for all Inbound and Outbound document packages.
- TED Reply Package Expire
Default Link expiration time for all Inbound document packages sent via the “Reply” link. *Refers to the amount of time that document packages can be downloaded from within your TED Express Inbound Email Notification.
- TED Outbound Access Code
Optional 2nd-Level Authentication for all outbound recipients to download/retrieve file packages. This access. If enabled, the Access Code can be communicated separately, or via the SMS text option.
- TED Outbound Package Expire
Default Link expiration time for all Outbound document packages. *Refers to the amount of time that document packages can be downloaded by your recipient(s) from within their TED Express Email Notification.
Email Notifications
Set Default email notifications for all sent and received document packages, as well as option CC and BCC information.
Email notification confirming that your document package has successfully been delivered.
- Confirmation of TED Outbound document(s) download by a recipient
Email notification confirming that your document package has been downloaded by your recipient.
Email notification that a secure document package has been sent to you via your TED Express Inbound URL.
Add additional recipients to receive TED Express email notifications. Multiple email addresses can be added (must be separated by commas).
Optional Contact Information
To be used for internal and/or administrative purposes.
Change Password
Allows you to change your TED Express login password. Password must contain at least one capital letter, one lower case letter, and a minimum length of 8 characters.
Close Account
Manually deactivate / opt-out of your SecureDock account. This option will cease billing at the end of the applied billing term. Account reactivation is available by request.
How to close my SecureDock online (instructions)
-
- log in to your SecureDock account by visiting: https://www.mysecuredock.com/m
- From the Dashboard page, click on Settings on the left
- Click the “Close Account” option located at the bottom of the sidebar menu.
Minimum System Requirements
PC
Operating System: Windows 7, Windows 8, Windows 10
Browser: Internet Explorer 9.x or higher, Firefox 28x or higher, Chrome 33.x or higher.
Memory: 2GB RAM recommended
Network Compatibility: Ethernet Card or Wi-Fi
MAC
Operating System: OSX 10.5 (Leopard), OSX 10.6.X (Snow Leopard or higher)
Browser: Safari 5.x or higher, Firefox 28.x or higher, Chrome 33.x or higher
Memory: 2GB RAM recommended
Network Compatibility: Ethernet Card or Wi-Fi