Frequently Asked Questions
How do I log into my SecureDock account?
How can I send files securely using SecureDock?
How can my clients send me files securely?
How do I add my SecureDock inbound link to my email signature?
How do I add documents to My Virtual Safe?
How do I retrieve files that are sent to me?
How can I track my sent or received items?
How do I add or updated my payment information?
How do I close my SecureDock account?
How do I enable Two-Factor Authentication for my account?
Who do I contact if I need more support?
Our user guide provides step-by-step instructions for securely sending and receiving files through SecureDock, along with essential account operations. For technical support or assistance, visit our support page to submit a support ticket for prompt help.
Getting Started
Account Login
To access your SecureDock account, you have the following options:
Method 1: Application Login Go to https://www.mysecuredock.com/m and enter your login credentials. We highly recommend bookmarking this URL in your browser for easy access in the future.
Method 2: Website Login Visit https://www.secure-dock.com and click on the Login link located in the site header section.
Feel free to choose the method that suits you best to securely log in to your SecureDock account.
Password Reset
To reset your login credentials, please follow these steps:
- Visit the SecureDock Login Page.
- Click on the “Forgot Password” link.
- Enter your existing username OR email address in the provided field.
- Click on the “Submit” button.
- If we have matching records on file, a password reset link will be sent to your inbox.

Your Dashboard
The dashboard page conveniently summarizes your account, offering a quick view of key information. Task reminders notify you of any urgent items needing attention.
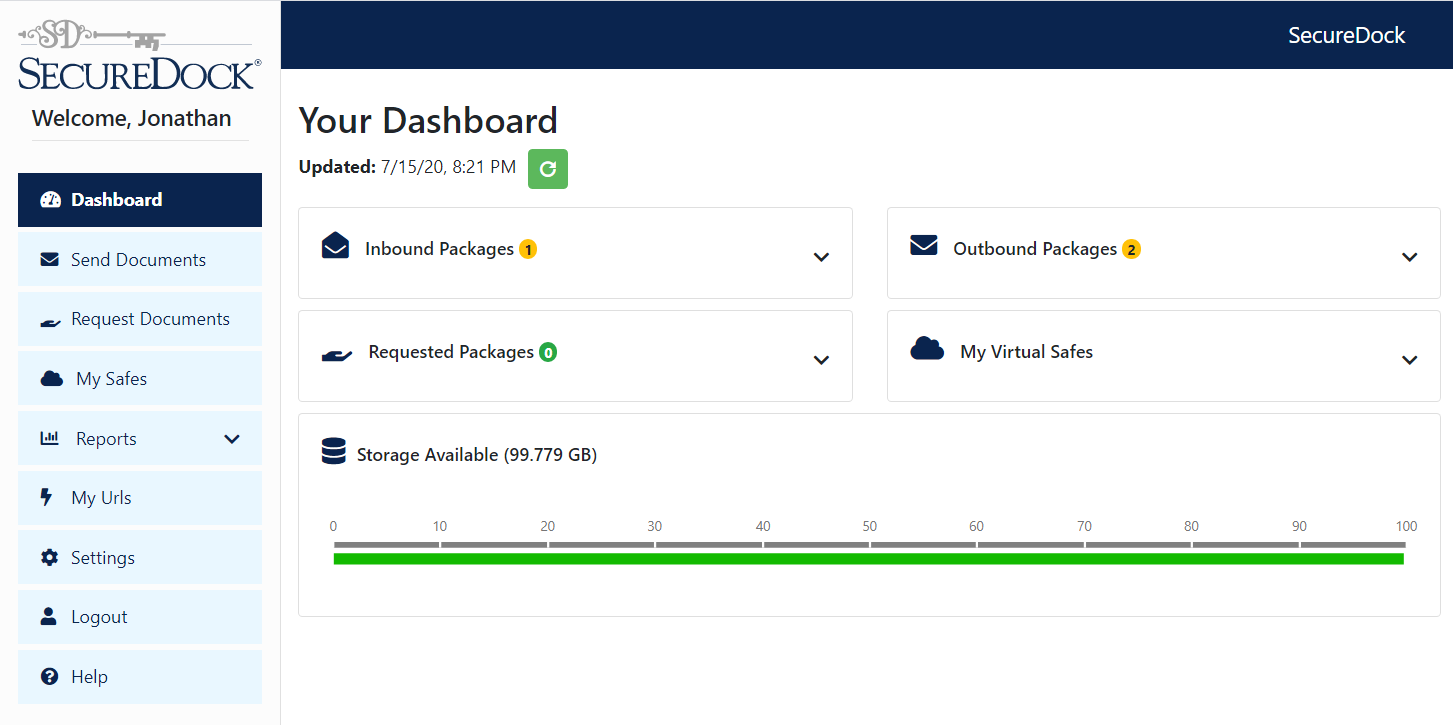
 Inbound Packages
This cell shows the count of inbound file packages or secure messages awaiting retrieval or view. Click the drop-down arrow to see new items received in the past 7 days or all time. It also provides a direct link to your Received Items report for detailed information.
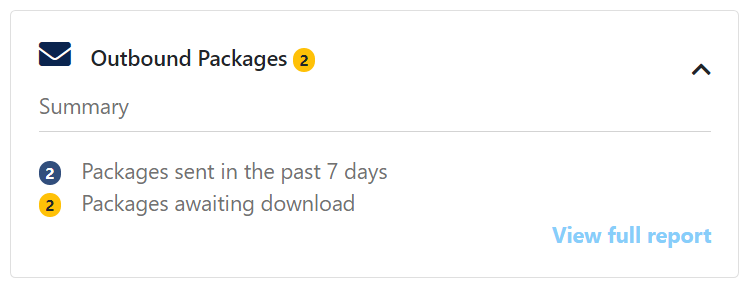 Outbound Packages
This cell shows the count of outbound file packages or secure messages awaiting download or view. Click the drop-down arrow to see outbound file packages sent in the past 7 days or all time. It also provides a direct link to your Sent Items report for detailed information about your sent files and messages.
 Requested Packages
This cell shows the number of pending document requests. Click the drop-down arrow to see requests sent in the past 7 days or all time. It also provides a direct link to your Requested Documents report for detailed information on your document requests
My Virtual Safes
This cell shows the number of active storage safes, stored documents, and available storage capacity in your Virtual Safe. It gives an overview of your Virtual Safe status and provides a direct link to manage and organize your storage safes on the My Virtual Safes page.
Notifications Bell
The notification bell is a vital feature designed to inform SecureDock account holders about significant updates and actions related to their account. It operates with three levels of notifications, each representing varying levels of importance. This functionality ensures that users stay informed about crucial events and can prioritize their attention accordingly. 
Send Documents
To securely send documents through SecureDock, click on the “Send Documents” link in the navigation bar. Follow the simple instructions provided below for a safe and protected file transfer, ensuring your documents are transmitted securely.
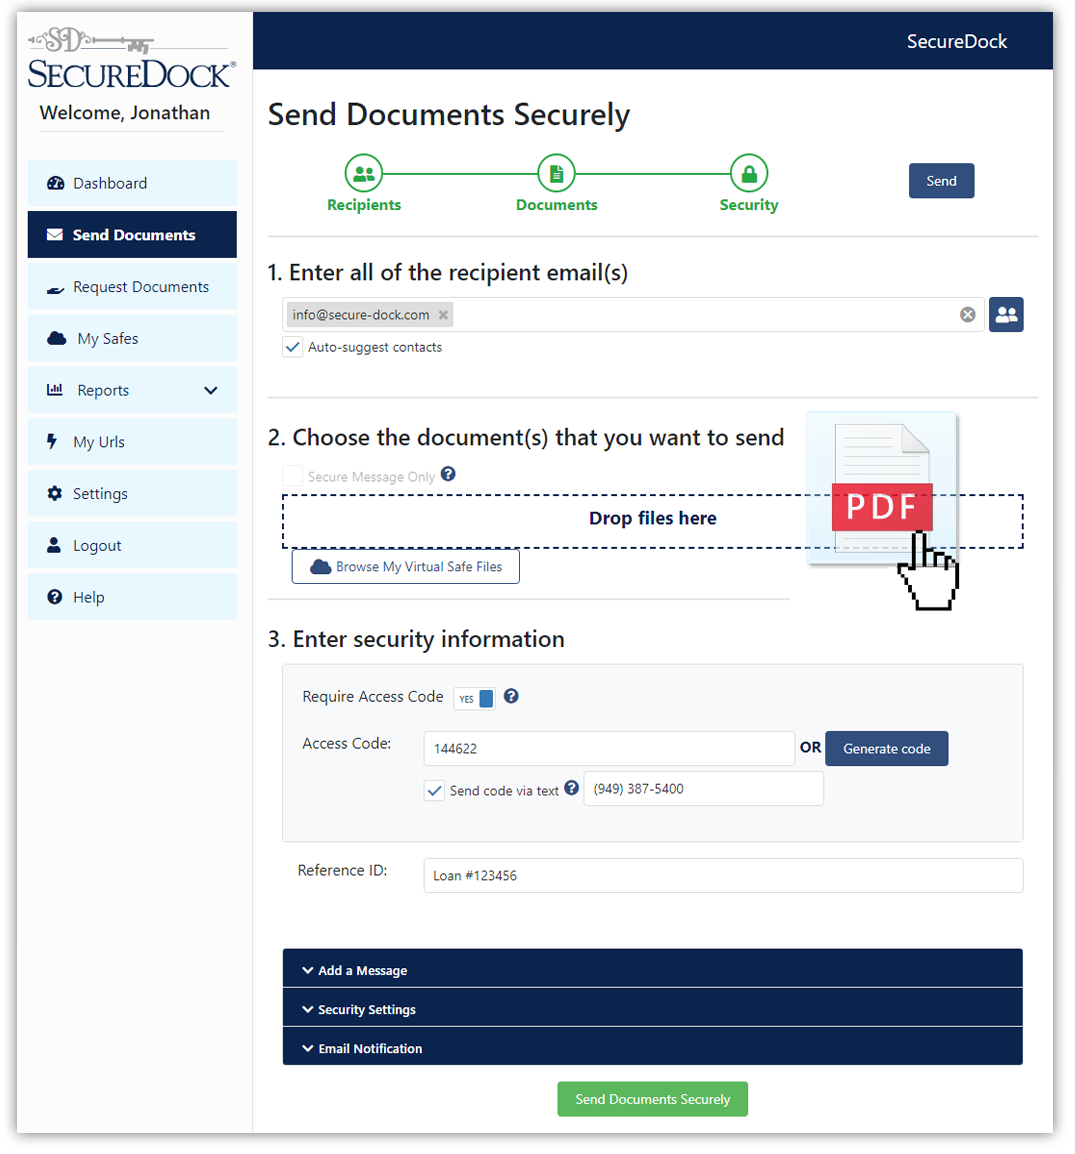
Step 1: Enter all of the recipient emails
- Enter one or more email addresses or select recipients from your contacts.
Step 2: Choose the document(s) that you want to send
- Click the ‘Browse’ button to select files from your computer, or click ‘Browse My Virtual Safe Files’ to choose files from your existing storage vault(s).
Step 3: Enter the security information
- Access Code: Add extra security with 2-Factor Authentication for outbound file transfers. Input up to 40 characters manually or generate automatically. Note:Senders must inform recipients about any additional access codes required. This can be done through automated SMS text, verbal communication (phone), or other secure methods.
- SMS Text Feature: Automatically send your Access Code to your recipient’s mobile device.

-
Reference ID: An additional identifier to help you track specific document packages (e.g., Loan ID, Policy #, Case #, etc.).
-
Recipient Instructions: Your provided instructions will be shown in the body of the email notifications and are separate from the secure file package.
-
Secure Message to Recipient: Your secure message will be automatically encrypted. It will only be visible to your recipient after they’ve completed the required verification, such as providing their email address and access code (if applicable).
-
Link Expiration: Choose how long you want your download link to remain active (24 hours, 48 hours, 72 hours, 7 days, or 14 days). After this period, the download link will no longer be accessible to your recipient. You can adjust your default Link Expiration in your account Settings.
-
Max. Downloads: Choose the maximum number of allowed package downloads per recipient (1, 3, 5, 10, or Unlimited). You can adjust the default Max. Downloads in your account Settings.
-
Email Notifications: Choose the automated email notifications you wish to receive. You can configure your default email notifications in your Account Settings.

Receiving Files (Inbound)
With SecureDock, clients can securely upload sensitive or large file sets using an encrypted inbound link placed directly on your email signature block or company website. The process eliminates the need for inbound senders to provide a login or password, ensuring a hassle-free experience. This feature enables efficient and secure file transfers without additional authentication requirements for clients.

To set up your SecureDock Inbound link, follow these steps:
- Click on “My URLs” in the left-hand navbar.
- Copy your Inbound URL or the pre-formatted text.
- Open your email signature editor or website builder.
- Paste the link at the bottom of your email signature block or on the desired page of your company’s website.

For sender instructions CLICK HERE
Inbound Upload Page – Client View
Clients clicking on your encrypted inbound link are seamlessly redirected to the secure upload page. There, they can easily add files and complete their secure file transfer without the need for logins or passwords. This streamlined process simplifies file transfers for clients, ensuring a smooth, hassle-free experience while maintaining the highest level of security for their uploads.

After the upload process is completed, the sender will receive an automated email notification confirming the successful and secure transfer of their files. As the recipient, you will also receive automated email notifications containing a download link to access the files securely. This email notification system ensures that both sender and recipient are promptly informed about the file transfer status and can access the necessary files easily.

Downloading documents
To download your documents, click on the “Download Now” link provided in your SecureDock email notification. You will be redirected to a verification page where you can securely input your SecureDock username and password to confirm your identity. This verification process ensures that only authorized individuals have access to the downloaded documents, maintaining the highest level of security for your files.

From the secure download page, select the option to download files to your device.

*SecureDock delivers packages in the convenient zip-file format. To unzip or extract the files, follow these steps:
- Locate your computer’s default download folder.
- Look for the zip file named “SecureDock[date].zip” (the date will be specific to your download).
- Right-click on the zip file and choose “Extract” or “Extract All.”
- Select the destination folder or location on your device where you want to extract the files.
- Click “Extract” to start the extraction process.
Note: By extracting the files from the zip archive, you will have access to the individual files within the package. If you need further assistance or want to learn more about working with zip files, feel free to explore additional resources on using Zip Files specific to your operating system. Learn more about using Zip Files
Downloading documents from your iOS or Android Device
For instructions on how to download/retrieve file packages from your iPad, iPhone, or Android device Click Here

Downloading documents from your reports
File packages can be downloaded directly from your Sent Items or Received Items reports by first clicking on the status icon in the far right column, then click the Download Docs option from the drop-down menu.

My Virtual Safes
Your Virtual Safe, available with the SecureDock Pro subscription level, is tailored for securely storing, accessing, organizing, and sharing documents on the cloud. It offers a convenient and secure solution for you and your team to manage important documents in one place. To access your Virtual Safe, log in to your SecureDock account and click on the “My Safes” link in the left navbar or select the “Go to Virtual Safes” option from your dashboard drop-down menu.

The My Virtual Safes page is divided into two main columns. The left column displays all your active storage safes, while the right column shows the contents of any selected storage safe, folder, or sub-folder. 
Please note: Depending on your industry or company workflow requirements, your default storage safes may contain a list of preloaded folders and sub-folders to help you better organize your documents.
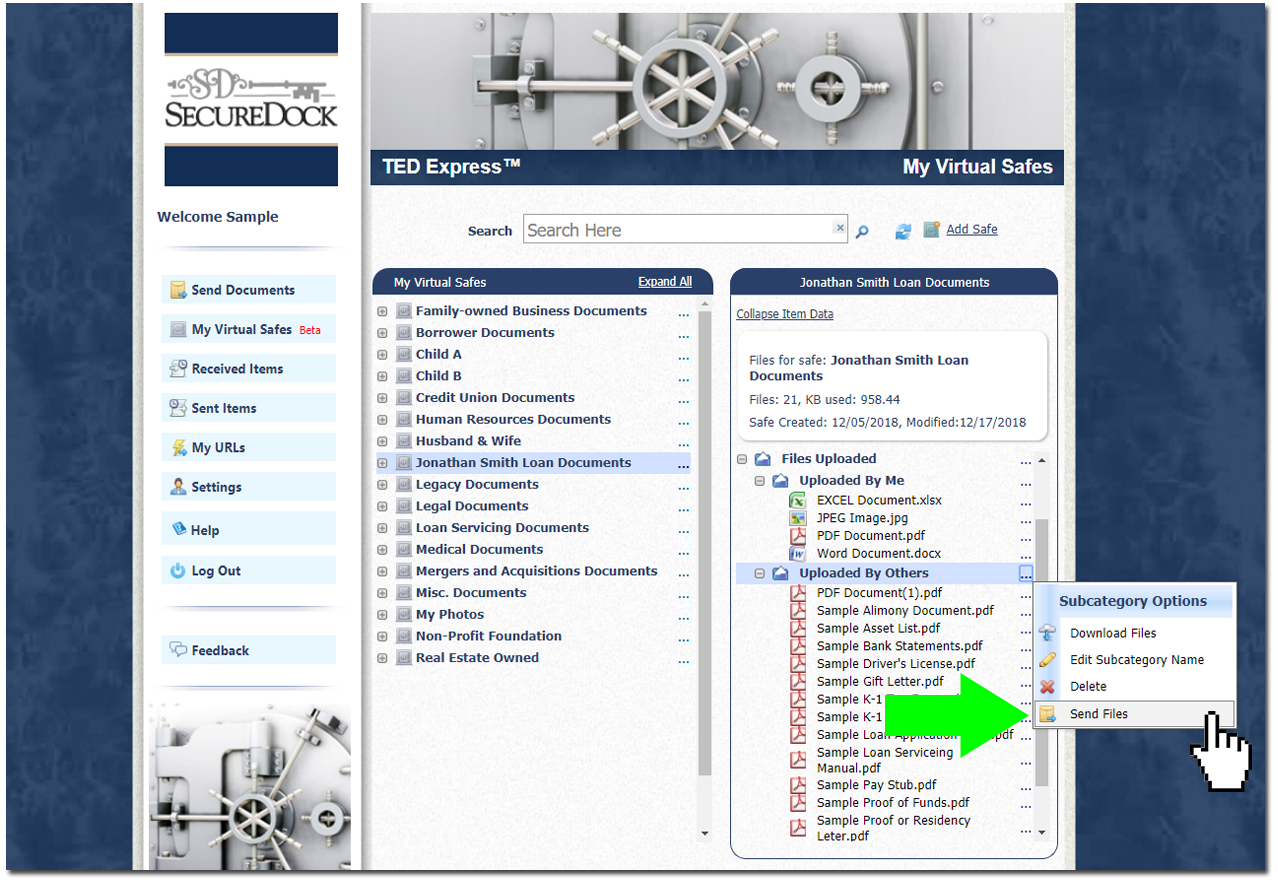
With the Virtual Safe, you now can share or give permissioned access to specific storage safes for team members or outside individuals. Below are instructions on how to share safes with colleagues in your organization or with outside individuals (non-account holders). To share safes with other members within your organization or designated access group, first, click on the Share Safe button located at the top of the My Virtual Safes page. This will open a dialog showing your list of available colleagues as well as options to manage your sharing permissions. While on the Colleagues Tab, scroll or use the search bar to select the individual you wish to share your safe with. Then, click the Edit Permissions button to select which storage safes and permissions you would like to give this user. Once your sharing permissions have been set, click the Save button to save your changes. Sharing Permissions: Read Only: Allows individuals to only download and send content within a shared safe. Allow Access: Allows individuals to download, edit, and send content within a shared safe. *Once your sharing permissions have been set, your colleague(s) will then be able to log in to their existing SecureDock account(s) and will see your shared safe displayed on their My Virtual Safes page, highlighted in BLUE indicating that the safe has been shared by you. Viewed from colleague’s perspective SecureDock reports offer real-time tracking of your sent and received file packages, providing you with valuable insights and control over your document management. With these reports, you can easily monitor the status and progress of your file transfers, ensuring that they are secure and accessible whenever you need them. Additionally, the reports empower you to perform various operations to enhance the security and organization of your files, allowing you to maintain complete control over your document management processes. The Sent Items report in SecureDock provides a comprehensive and chronological list of all your outbound transactions, with the most recent ones displayed at the top. This report serves as a valuable tool for tracking and managing your secure file packages effectively. Additionally, the Sent Items report offers a range of advanced reporting tools that enable you to gain deeper insights into your file transfers and enhance your overall management capabilities. You can access this report either through your dashboard or by navigating to the Reports tab in the navigation menu. In the Sent Items report, you will find the following data associated with each sent document package: The possible statuses are: Within the Sent Items section, you have access to various package options that allow you to perform essential tasks related to a selected document package. These options can be accessed by clicking on the status icon of the document package you are viewing. Here are the available options: The Recipient Options offer various actions for the selected document package. Starting from the Sent Items page, in the “Recipient” column, left-click on the recipient you want to manage. A drop-down menu will appear with the following available options: Clicking on the + sign in the far left column expands your Package Details. From there, you can select any of the available tabs to view more in-depth information about your file package. The Received Items report presents a chronological list of all your inbound file transfers, with the latest items shown at the top. This report offers advanced reporting tools to help you effectively manage your secure file packages. You can access the Received Items report in two ways: Your package options enable you to carry out essential tasks for any selected document package. These options will be applied to the entire document package, including all included recipients. You can access these options by clicking on the status icon of the document package you are viewing. Clicking on the “+” sign in the far-left column will expand your Package Details. From there, you can select any of the available tabs to view more in-depth details about your file package. Experience our enhanced reports that have been optimized for a streamlined and speedy user experience. These reports offer real-time tracking and detailed information about your sent and received file packages, providing you with valuable insights and greater control over your document packages. With the latest version, monitoring the status and progress of your file transfers is now even more effortless, ensuring their security and accessibility whenever required. Furthermore, these upgraded reports empower you to execute various operations to enhance file security and organization, granting you complete control over your document management processes. Preview The My URLs page is a centralized location within your SecureDock account where you can find all the essential Inbound URLs associated with your account. This page serves as a reference point for managing and accessing the various URLs that facilitate secure file transfers and communication. Your SecureDock account settings enable you to manage and update important information related to your profile, billing, security, and email notifications. Displays basic account login information such as username, email address, and any additional contact details used for internal or administrative purposes.” Close Account Option This option allows you to manually deactivate / opt-out of your SecureDock account. Be Advised: By closing your SecureDock account, all access to your account and stored documents will end at the conclusion of your billing cycle. Your documents will remain on the SecureDock system until the end of your archive period, and then they will be destroyed. Customize your account security settings by configuring your logon two-factor authentication method, updating your password, and managing your 2FA recovery keys. Change My Password Allows you to update your SecureDock login password from within your account. Log On Two-Factor Authentication (2FA) Enhance the security of your account with the option to enable Two-Factor Authentication during login. Choose your preferred method of 2FA, either SMS text code or Authenticator App, to ensure an added layer of protection. How to enable 2FA via SMS How to enable 2FA via Authenticator App (Recommended) View your current subscription level and manage your File Transfer Settings and Virtual Safe storage settings. These are the default email notification settings that will be applied to your inbound and outbound file transfers. Additional email CCs and BCCs can also be applied here. Valid credit card information must be added to your account to continue service (unless you are billed externally through your company). Credit card information can be updated on your account Settings page. Your billing history displays all billing-related actions that have occurred in your account. These includes the action dates, billing descriptions, and payments statuses. *Printable/exportable invoices and billing history are also available in Excel and PDF format. Separate billing invoices can be provided upon request by contacting us at info@secure-dock.com PC MAC Please note that these are general minimum requirements, and specific software or applications may have additional or higher system requirements. It’s always a good idea to check the system requirements provided by the software vendor for the specific application you intend to use. Method 2: Store inbound documents directly into a new or existing virtual safe from the download options page. Instructions:
Method 3: Have you or your clients upload documents directly to your Virtual Safe using a Direct Upload URL. Instructions:
Instructions:
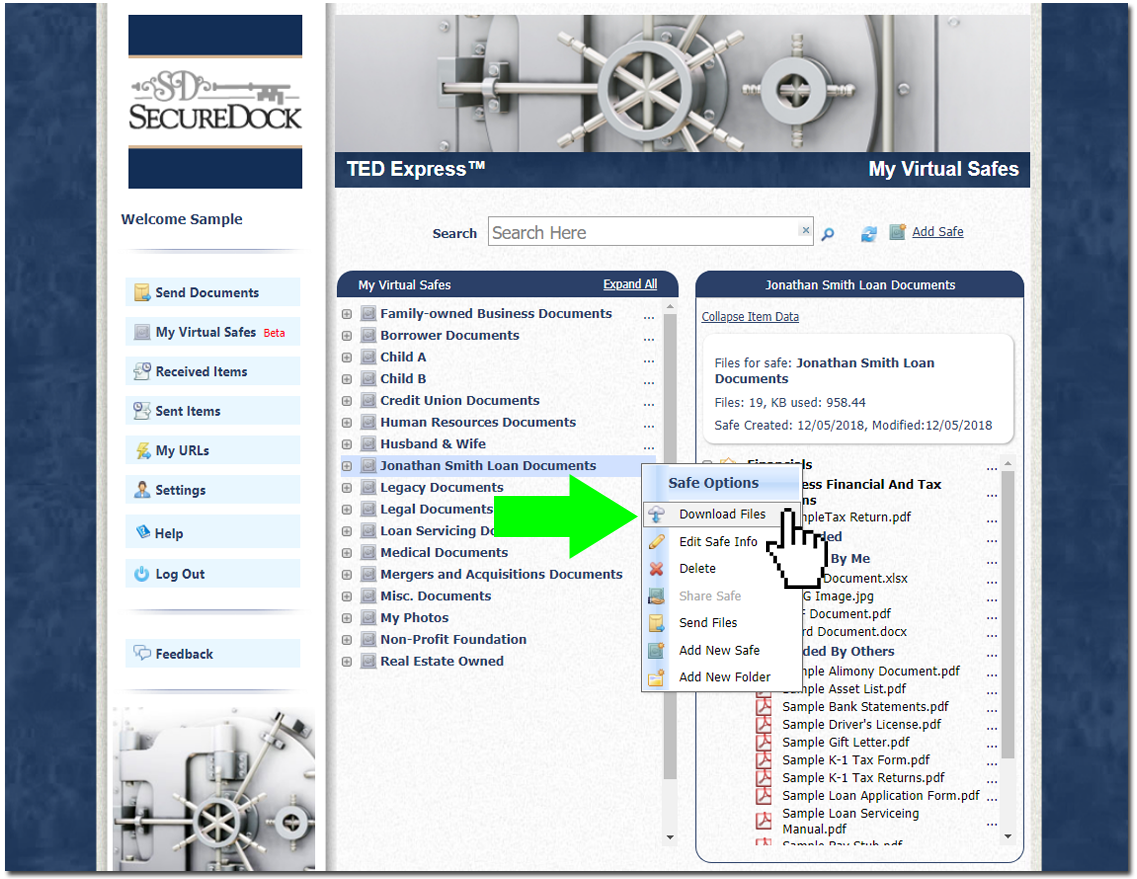
To download or preview documents from within your Virtual Safe: Instructions:
With the Virtual Safe, you now can share or give permissioned access to specific storage safes for team members or outside individuals. Below are instructions on how to share safes with colleagues in your organization or with outside individuals (non-account holders). To share safes with other members within your organization or designated access group, first, click on the Share Safe button located at the top of the My Virtual Safes page. This will open a dialog showing your list of available colleagues as well as options to manage your sharing permissions. While on the Colleagues Tab, scroll or use the search bar to select the individual you wish to share your safe with. Then, click the Edit Permissions button to select which storage safes and permissions you would like to give this user. Once your sharing permissions have been set, click the Save button to save your changes. Sharing Permissions: Read Only: Allows individuals to only download and send content within a shared safe. Allow Access: Allows individuals to download, edit, and send content within a shared safe. *Once your sharing permissions have been set, your colleague(s) will then be able to log in to their existing SecureDock account(s) and will see your shared safe displayed on their My Virtual Safes page, highlighted in BLUE indicating that the safe has been shared by you. Viewed from colleague’s perspective SecureDock reports offer real-time tracking of your sent and received file packages, providing you with valuable insights and control over your document management. With these reports, you can easily monitor the status and progress of your file transfers, ensuring that they are secure and accessible whenever you need them. Additionally, the reports empower you to perform various operations to enhance the security and organization of your files, allowing you to maintain complete control over your document management processes. The Sent Items report in SecureDock provides a comprehensive and chronological list of all your outbound transactions, with the most recent ones displayed at the top. This report serves as a valuable tool for tracking and managing your secure file packages effectively. Additionally, the Sent Items report offers a range of advanced reporting tools that enable you to gain deeper insights into your file transfers and enhance your overall management capabilities. You can access this report either through your dashboard or by navigating to the Reports tab in the navigation menu. In the Sent Items report, you will find the following data associated with each sent document package: The possible statuses are: Within the Sent Items section, you have access to various package options that allow you to perform essential tasks related to a selected document package. These options can be accessed by clicking on the status icon of the document package you are viewing. Here are the available options: The Recipient Options offer various actions for the selected document package. Starting from the Sent Items page, in the “Recipient” column, left-click on the recipient you want to manage. A drop-down menu will appear with the following available options: Clicking on the + sign in the far left column expands your Package Details. From there, you can select any of the available tabs to view more in-depth information about your file package. The Received Items report presents a chronological list of all your inbound file transfers, with the latest items shown at the top. This report offers advanced reporting tools to help you effectively manage your secure file packages. You can access the Received Items report in two ways: Your package options enable you to carry out essential tasks for any selected document package. These options will be applied to the entire document package, including all included recipients. You can access these options by clicking on the status icon of the document package you are viewing. Clicking on the “+” sign in the far-left column will expand your Package Details. From there, you can select any of the available tabs to view more in-depth details about your file package. Experience our enhanced reports that have been optimized for a streamlined and speedy user experience. These reports offer real-time tracking and detailed information about your sent and received file packages, providing you with valuable insights and greater control over your document packages. With the latest version, monitoring the status and progress of your file transfers is now even more effortless, ensuring their security and accessibility whenever required. Furthermore, these upgraded reports empower you to execute various operations to enhance file security and organization, granting you complete control over your document management processes. Preview The My URLs page is a centralized location within your SecureDock account where you can find all the essential Inbound URLs associated with your account. This page serves as a reference point for managing and accessing the various URLs that facilitate secure file transfers and communication. Your SecureDock account settings enable you to manage and update important information related to your profile, billing, security, and email notifications. Displays basic account login information such as username, email address, and any additional contact details used for internal or administrative purposes.” Close Account Option This option allows you to manually deactivate / opt-out of your SecureDock account. Be Advised: By closing your SecureDock account, all access to your account and stored documents will end at the conclusion of your billing cycle. Your documents will remain on the SecureDock system until the end of your archive period, and then they will be destroyed. Customize your account security settings by configuring your logon two-factor authentication method, updating your password, and managing your 2FA recovery keys. Change My Password Allows you to update your SecureDock login password from within your account. Log On Two-Factor Authentication (2FA) Enhance the security of your account with the option to enable Two-Factor Authentication during login. Choose your preferred method of 2FA, either SMS text code or Authenticator App, to ensure an added layer of protection. How to enable 2FA via SMS How to enable 2FA via Authenticator App (Recommended) View your current subscription level and manage your File Transfer Settings and Virtual Safe storage settings. These are the default email notification settings that will be applied to your inbound and outbound file transfers. Additional email CCs and BCCs can also be applied here. Valid credit card information must be added to your account to continue service (unless you are billed externally through your company). Credit card information can be updated on your account Settings page. Your billing history displays all billing-related actions that have occurred in your account. These includes the action dates, billing descriptions, and payments statuses. *Printable/exportable invoices and billing history are also available in Excel and PDF format. Separate billing invoices can be provided upon request by contacting us at info@secure-dock.com PC MAC Please note that these are general minimum requirements, and specific software or applications may have additional or higher system requirements. It’s always a good idea to check the system requirements provided by the software vendor for the specific application you intend to use. There are three methods for adding documents to your storage safes: Method 1: Manually select files from your computer or device and upload them directly using the Browse feature located at the bottom of the My Virtual Safes page. Instructions: Method 2: Store inbound documents directly into a new or existing virtual safe from the download options page. Instructions:
Method 3: Have you or your clients upload documents directly to your Virtual Safe using a Direct Upload URL. Instructions:
_ Instructions:
To download or preview documents from within your Virtual Safe: Instructions:
With the Virtual Safe, you now can share or give permissioned access to specific storage safes for team members or outside individuals. Below are instructions on how to share safes with colleagues in your organization or with outside individuals (non-account holders). To share safes with other members within your organization or designated access group, first, click on the Share Safe button located at the top of the My Virtual Safes page. This will open a dialog showing your list of available colleagues as well as options to manage your sharing permissions. While on the Colleagues Tab, scroll or use the search bar to select the individual you wish to share your safe with. Then, click the Edit Permissions button to select which storage safes and permissions you would like to give this user. Once your sharing permissions have been set, click the Save button to save your changes. Sharing Permissions: Read Only: Allows individuals to only download and send content within a shared safe. Allow Access: Allows individuals to download, edit, and send content within a shared safe. *Once your sharing permissions have been set, your colleague(s) will then be able to log in to their existing SecureDock account(s) and will see your shared safe displayed on their My Virtual Safes page, highlighted in BLUE indicating that the safe has been shared by you. Viewed from colleague’s perspective SecureDock reports offer real-time tracking of your sent and received file packages, providing you with valuable insights and control over your document management. With these reports, you can easily monitor the status and progress of your file transfers, ensuring that they are secure and accessible whenever you need them. Additionally, the reports empower you to perform various operations to enhance the security and organization of your files, allowing you to maintain complete control over your document management processes. The Sent Items report in SecureDock provides a comprehensive and chronological list of all your outbound transactions, with the most recent ones displayed at the top. This report serves as a valuable tool for tracking and managing your secure file packages effectively. Additionally, the Sent Items report offers a range of advanced reporting tools that enable you to gain deeper insights into your file transfers and enhance your overall management capabilities. You can access this report either through your dashboard or by navigating to the Reports tab in the navigation menu. In the Sent Items report, you will find the following data associated with each sent document package: The possible statuses are: Within the Sent Items section, you have access to various package options that allow you to perform essential tasks related to a selected document package. These options can be accessed by clicking on the status icon of the document package you are viewing. Here are the available options: The Recipient Options offer various actions for the selected document package. Starting from the Sent Items page, in the “Recipient” column, left-click on the recipient you want to manage. A drop-down menu will appear with the following available options: Clicking on the + sign in the far left column expands your Package Details. From there, you can select any of the available tabs to view more in-depth information about your file package. The Received Items report presents a chronological list of all your inbound file transfers, with the latest items shown at the top. This report offers advanced reporting tools to help you effectively manage your secure file packages. You can access the Received Items report in two ways: Your package options enable you to carry out essential tasks for any selected document package. These options will be applied to the entire document package, including all included recipients. You can access these options by clicking on the status icon of the document package you are viewing. Clicking on the “+” sign in the far-left column will expand your Package Details. From there, you can select any of the available tabs to view more in-depth details about your file package. Experience our enhanced reports that have been optimized for a streamlined and speedy user experience. These reports offer real-time tracking and detailed information about your sent and received file packages, providing you with valuable insights and greater control over your document packages. With the latest version, monitoring the status and progress of your file transfers is now even more effortless, ensuring their security and accessibility whenever required. Furthermore, these upgraded reports empower you to execute various operations to enhance file security and organization, granting you complete control over your document management processes. Preview The My URLs page is a centralized location within your SecureDock account where you can find all the essential Inbound URLs associated with your account. This page serves as a reference point for managing and accessing the various URLs that facilitate secure file transfers and communication. Your SecureDock account settings enable you to manage and update important information related to your profile, billing, security, and email notifications. Displays basic account login information such as username, email address, and any additional contact details used for internal or administrative purposes.” Close Account Option This option allows you to manually deactivate / opt-out of your SecureDock account. Be Advised: By closing your SecureDock account, all access to your account and stored documents will end at the conclusion of your billing cycle. Your documents will remain on the SecureDock system until the end of your archive period, and then they will be destroyed. Customize your account security settings by configuring your logon two-factor authentication method, updating your password, and managing your 2FA recovery keys. Change My Password Allows you to update your SecureDock login password from within your account. Log On Two-Factor Authentication (2FA) Enhance the security of your account with the option to enable Two-Factor Authentication during login. Choose your preferred method of 2FA, either SMS text code or Authenticator App, to ensure an added layer of protection. How to enable 2FA via SMS How to enable 2FA via Authenticator App (Recommended) View your current subscription level and manage your File Transfer Settings and Virtual Safe storage settings. These are the default email notification settings that will be applied to your inbound and outbound file transfers. Additional email CCs and BCCs can also be applied here. Valid credit card information must be added to your account to continue service (unless you are billed externally through your company). Credit card information can be updated on your account Settings page. Your billing history displays all billing-related actions that have occurred in your account. These includes the action dates, billing descriptions, and payments statuses. *Printable/exportable invoices and billing history are also available in Excel and PDF format. Separate billing invoices can be provided upon request by contacting us at info@secure-dock.com PC MAC Please note that these are general minimum requirements, and specific software or applications may have additional or higher system requirements. It’s always a good idea to check the system requirements provided by the software vendor for the specific application you intend to use.
Sharing Safes
Sharing with colleagues


Reports

Sent Items
Package Options (Sent Items)

Recipient Options (Sent Items)

Package Details (Sent Items)

Received Items
Package Options (Received Items)

Package Details (Received Items)

Responsive Reports
 Simplified responsive design Our streamlined and highly adaptable page design reduces the need for excessive clicking and enhances navigation seamlessly across various devices and web browsers. Faster performance Our enhanced search filtering and data sorting mechanism enables expedited loading and retrieval of document packages for both individual account holders and team configurations. _
My URLs
Account Settings
Profile Tab

Security Tab
 Password Requirements:

Account Tab

File Transfer Settings
Virtual Safe Settings
Email Notifications Tab

Billing Tab
How to add payment information online (instructions)

Billing History

Minimum System Requirements
![]()
![]()


To send documents securely from within our Virtual Safe:
Download Document From Your Virtual Safe
Sharing Safes
Sharing with colleagues
Reports
Sent Items
Package Options (Sent Items)
Recipient Options (Sent Items)
Package Details (Sent Items)
Received Items
Package Options (Received Items)
Package Details (Received Items)
Responsive Reports
Simplified responsive design Our streamlined and highly adaptable page design reduces the need for excessive clicking and enhances navigation seamlessly across various devices and web browsers. Faster performance Our enhanced search filtering and data sorting mechanism enables expedited loading and retrieval of document packages for both individual account holders and team configurations. _
My URLs
Account Settings
Profile Tab
Security Tab
Password Requirements:
Account Tab
File Transfer Settings
Virtual Safe Settings
Email Notifications Tab
Billing Tab
How to add payment information online (instructions)
Billing History
Minimum System Requirements
![]()
![]()
Adding Documents to your Virtual Safes
To send documents securely from within our Virtual Safe:
Download Document From Your Virtual Safe
Sharing Safes
Sharing with colleagues
Reports
Sent Items
Package Options (Sent Items)
Recipient Options (Sent Items)
Package Details (Sent Items)
Received Items
Package Options (Received Items)
Package Details (Received Items)
Responsive Reports
Simplified responsive design Our streamlined and highly adaptable page design reduces the need for excessive clicking and enhances navigation seamlessly across various devices and web browsers. Faster performance Our enhanced search filtering and data sorting mechanism enables expedited loading and retrieval of document packages for both individual account holders and team configurations. _
My URLs
Account Settings
Profile Tab
Security Tab
Password Requirements:
Account Tab
File Transfer Settings
Virtual Safe Settings
Email Notifications Tab
Billing Tab
How to add payment information online (instructions)
Billing History
Minimum System Requirements
![]()
![]()